Our purpose here is to present basic concepts for up-and-coming systems engineers. Now that we have completed our introductory look at electronic circuits and digital circuitry, we are finally ready to begin looking at the microcontroller unit (MCU) that sits at the core of each system. We start with an introduction to the MCU’s basic structure and operation. In the next session we will look at the MCU’s peripheral circuitry. And finally we will try using an MCU in an actual system.
Most modern electronic devices include one or more MCUs. Indeed, MCUs are ubiquitous: they’re essential to the operation of cell phones; they’re in refrigerators and washers and most other household appliances; they control flashing lights in children’s toys; and much more. So what is it, exactly, that the MCU is doing in all of these devices? The answer is simple: It’s controlling the hardware that implements the device’s operation. The MCU receives inputs from buttons, switches, sensors, and similar components; and controls the peripheral circuitry—such as motors and displays—in accordance with a preset program that tells it what to do and how to respond.
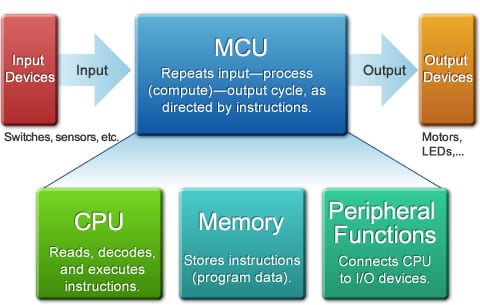
Figure 1 shows the structure of a typical MCU. The MCU incorporates a CPU (central processing unit), some memory, and some circuitry that implements peripheral functionalities. If we wish to anthropomorphize, we can say that the CPU does the "thinking," the memory stores the relevant information, and the peripheral functions implement the nervous system―the inputs (seeing, hearing, feeling) and the responses (hand and foot movements, etc.).

Figure 1: MCU Structure
But when we say that the CPU "thinks," we certainly do not mean to suggest that it has consciousness, or that it is capable of pursuing an independent line of thought. Indeed, its operation is entirely determined by a program—an ordered sequence of instructions—stored in memory. The CPU simply reads and executes these instructions in the predetermined order.
And these instructions themselves are by no means sophisticated—there is no instruction that can tell the machine to "walk" or to "talk," for example. Instead, a typical instruction might tell the CPU to "read data from address XXX in memory," or "write data to memory address YYY," or "add" or "multiply" two values, and so on. But while each instruction is simple, they can be organized into long sequences that can drive many complicated functionalities.
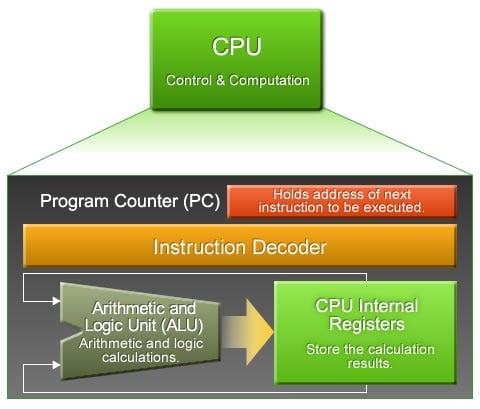
Figure 2 shows the role of the CPU in an embedded system.
The program counter (PC) is an internal register that stores the memory address of the next instruction for the CPU to execute. By default, the PC value is automatically incremented each time an instruction executes. The PC starts at 0000, so the CPU starts program execution with the instruction at address 0000. As the instruction executes, the PC automatically advances to 0001. The CPU then executes the instruction at 0001, the PC advances again, and the process continues, moving sequentially through the program.
The decoder circuitry decodes each instruction read from the memory, and uses the results to drive the MCU’s arithmetic and operational circuitry. An actual decoder is a somewhat more complicated version of the decoder circuitry we studied in the session titled "Introduction to Digital Circuits-Part 2". It restores the encoded instructions to their original, unencoded form.

Figure 2: What the CPU Does
This circuitry carries out arithmetic and logical operations. Arithmetic operations include addition and multiplication; logic operations include AND, OR, and bit shifts. The ALU is controlled by the instruction decoder. In general, the ALU consists of a complex combination of circuits.
These registers store transient information. General-purpose registers hold results of arithmetic and logical operations, whereas specialized registers store specific types of information—such as a flag register, which stores flag values (carry flag, etc.). When the ALU performs an operation, it does not operate directly on values in memory; instead, the data at the specified memory address is first copied into a general-purpose register, and the ALU uses the register content for the calculation.
As an illustration of how the CPU works, let’s see how it would execute a simple addition: 3+4. First, the following program code and data must be saved to memory.
| Address | Instruction (a binary code value identifying the action to be taken) | |
|---|---|---|
| 0000 | Read the value at memory address 0100, and store it in Register 1. | |
| 0001 | Read the value at memory address 0101, and store it in Register 2. | |
| 0002 | Add the value in Register 2 to the value in Register 1, and save the result in Register 1. | |
| ~ | ||
| Address | Data | |
| 0100 | 3 | |
| 0101 | 4 | |
Step 1: When the CPU starts, it fetches the instruction stored at the address given in the program counter: in this case, at address 0000. It decodes and then executes this instruction. In this example, the instruction tells the CPU to get the value in memory address 0100 and write it into Register 1.
Step 2: The CPU fetches the instruction stored at address 0001 (the new value in the program counter), then decodes and executes it. The program counter is incremented again.
Step 3: The CPU fetches the instruction stored at address 0002 (the new value in the program counter), then decodes and executes it. The instruction tells the CPU to add the contents of Registers 1 and 2, and write the result into Register 1.
Register 1 now holds the sum of 3 and 4, which is 7. This completes the addition. As you can see, the CPU executes a program by carrying out an ordered sequence of very simple operations.
The MCU’s memory is used to store program code and data. There are two main types of memory: ROM and RAM.
This memory retains its content even while power is off. This memory is for reading only; it cannot be erased or overwritten. ROM is typically used to store the start-up program (executed immediately after power-on or reset), and to store constant values that may be freely accessed by running programs.
Many Renesas MCUs use flash memory in place of ROM. Like ROM, flash memory retains its content even while power is off. Unlike ROM, this content can be overwritten.
This memory can be freely rewritten. Its disadvantage is that it loses its content when the power goes off. This memory is mainly used to store program variables.
Many single-chip MCUs 1 use static RAM (SRAM) for their internal RAM. SRAM offers two advantages it supports faster access, and it does not require periodic refreshment. The disadvantage is that the internal circuitry is complex, making it difficult to pack large quantities on the chip’s limited space. SRAM is not suitable for implementing large memory sizes.
The alternative to SRAM is DRAM (dynamic RAM). The simple structure of DRAM allows large quantities to be mounted in small spaces; typical DRAM sizes are much bigger than typical SRAM sizes. But it is difficult to form DRAM together with high-speed logic on a single wafer. For this reason, DRAM is generally not used within single-chip MCUs. Instead, it is typically connected to the chip and treated as peripheral circuitry.
1. An MCU implemented on a single LSI (large scale integration) chip. The chip holds the CPU, some ROM, some RAM, oscillator circuitry, timer circuitry, serial interfacing, and other components. If the chip also includes the system’s main peripheral circuitry, it is called a "system LSI."
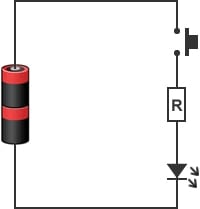
Let’s take a quick look at why MCUs are currently used in so many devices. For our example, consider a circuit that causes a LED lamp to light up when a switch is pressed. Figure 3 shows what the circuit looks like when no MCU is used. This simple circuit has only three components: the LED, the switch, and a resistor.

Figure 3: A LED Lamp Circuit with No MCU
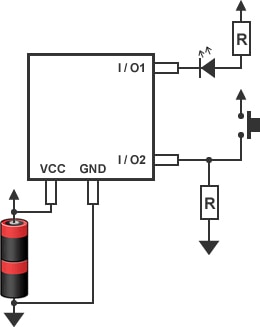
Figure 4, in contrast, shows the circuit design when an MCU is included.
Clearly, the design is now more complicated. Why spend the extra time and money to develop such a design, when the other version is so much simpler?
But let’s consider this for a moment! Suppose that we later decide to modify the operation of the circuits shown above, so that the LED lamp will begin flashing at a certain time after the switch is pressed. For the circuit with the MCU, all we need to do is to change the program—there is no need to touch the design itself. For the circuit without the MCU, however, we need to redesign the circuit—adding a timer IC to count the time, a logic IC and FPGA to implement the logic, and so on.
So the presence of the MCU makes it much easier to change the operation and to add new functionality. That’s why so many devices now include MCUs—because they make things so much easier.

Figure 4: A LED Lamp Circuit with an MCU
In part 2 of this MCU introduction, we will talk about the MCU’s peripheral circuitry. We look forward to your continued participation.
Get the latest news, products, and solutions delivered straight to your inbox.